| Welcome to HaleNET |
 |
 |
 |
 |
 |
 |
| |
SundayJune30 |
| |
| Halenet Web Services |
 |
 |
|
|
HaleNET Setup for Windows 98
| Step | Images |
Step 1.
Running Inetwiz
| Instructions |
Step 2.
Inetwiz Wizard Steps
| Instructions |
Step 3.Optimising your system
HaleNET recommends that customers check a couple of settings in order to prevent connection difficulties that may arise.
To do this customers are asked to check the setting in your dialup networking connection as well as in the network TCP/IP properties.
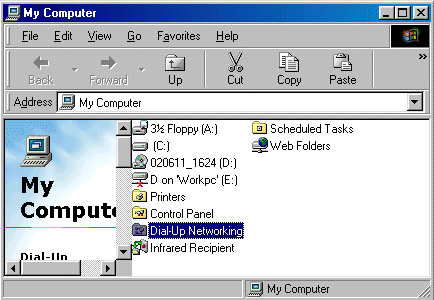
First goto your desktop by either minimising or closing all you open windows.
Next Double click on "My Computer". It is normally at he top left hand corner of your desktop.
Next Double Click on the "Dialup Networking" icon.
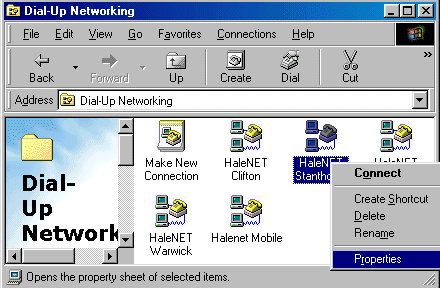
You should now have two icons. Make new connection and HaleNET Stanthorpe / Tenterfield / or Warwick.
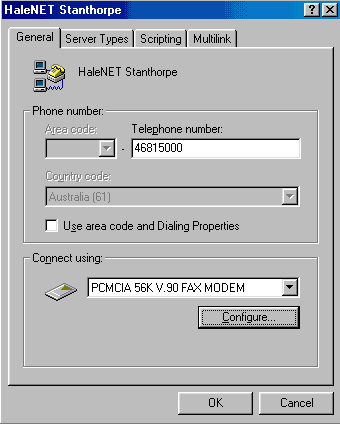
"Right Click with your Right mouse button" on HaleNET xxxxx. This will bring up a menu. Choose the properties option at the bottom of the menu.
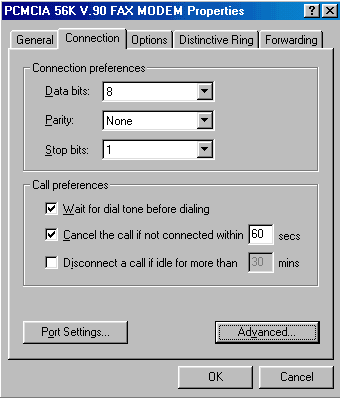
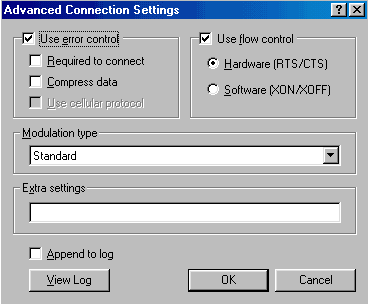
Next select the Configure option under the modem on the General tab. Then select configure from the options at the top of the next window, then select Advanced down the bottom of the next window.
At the top left hand corner of the current window there is an option that says use error control. Below this there is an option "Compress Data". Make sure it is NOT ticked. If it is click on the tick to remove it.
To save this change you must click on the "OK" button twice to take you back to the "General tab"
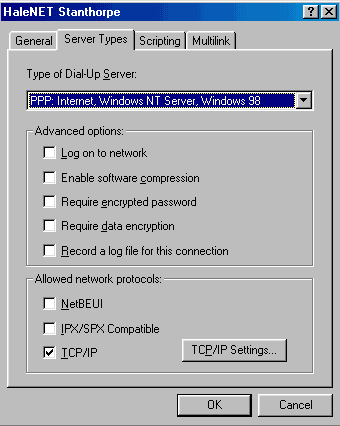
Next select the "Server Types" tab at the top of the current window.
There are two sections, Advanced Options and Allowed Network Protocols on this screen. Make sure all the options in the Advanced options are "Unticked" and check to make sure that only TCP/IP is selected in the Allowed Network protocols section.
Next click on the TCP/IP Settings Tab.
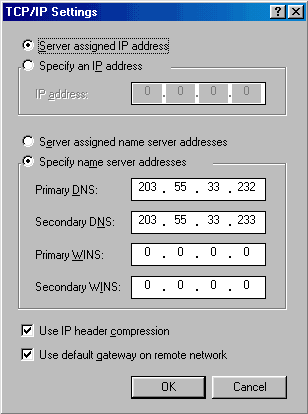
Your IP address is Server assigned, so the first radio button should be selected.
You do not have to specify the Domain name servers, however if you choose to then make sure the 4th radio button is selected.
You will now notice that your Primary and Secondary / Alternate name servers are no longer greyed out. Highlight the first "0" in the Primary DNS option box and type 203.55.33.232 into the fields provided. If you type it exactly as "203.55.33.232" with the "full stops" it will put the correct number in the correct field for you.
Next in the Secondary / Alternate DNS box type 203.55.33.233
To save the changes Click "OK"
Close your dialup networking window.
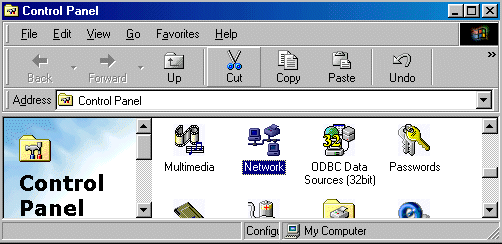
Next Select your "Start Button"
Then Select Settings from the menu followed by Control Panel
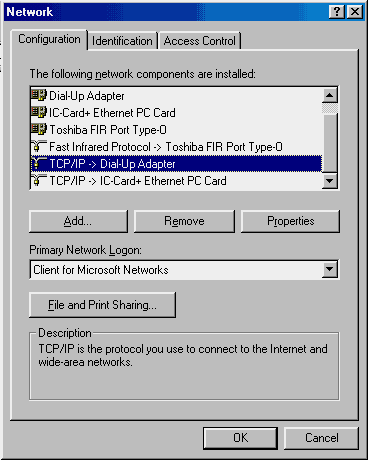
In your control panel double click onto the "Network" icon.
To perform this operation you may need your Windows 98 CDROM. Please don't go any further with out having it handy.
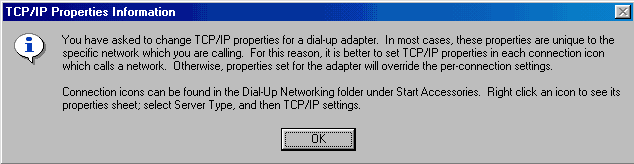
Select TCP/ IP or TCP/IP dialup adapter from the menu options.
A window will appear asking if you want to continue. Select "OK"
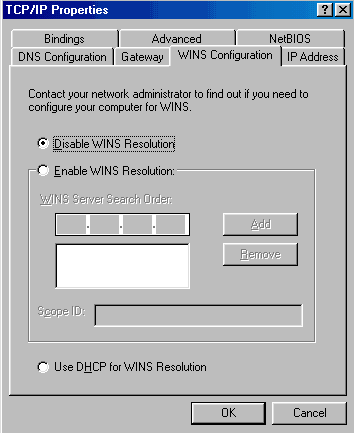
Click on the "WINS Configuration" Tab
Make sure the "Disable Wins Resolution is Ticked"
Select "OK" then Select "OK" again. Windows should prompt you to restart the computer. Restart the computer
|
Instructions

|
Step 4.
Setting up your Browser.
| Instructions |
Step 5.
Connecting for the first time
| Instructions |
Step 6.
Troubleshooting
| Instructions |
| | |
Web Design by HaleNET
|


 i
i


